This article provides a comprehensive overview of tracheostomy procedures, types of tracheostomy tubes, mechanical ventilation modes, and the process of weaning patients from mechanical support. It covers emergency airway access, tube components, cuffed vs. cuffless and fenestrated tubes, positive and negative pressure
In critical care and respiratory medicine, maintaining a patent airway is the highest priority. When a patient cannot breathe effectively on their own due to upper airway obstruction, respiratory failure, or the need for long-term mechanical support, healthcare providers must utilize artificial airways and ventilation strategies. This article explores the surgical and procedural methods used to secure an airway, the various types of tracheostomy tubes, and the complex process of weaning a patient from mechanical ventilation.
Emergency Airway Access: Cricothyroidotomy vs. Tracheostomy
When a patient faces an acute upper airway obstruction—such as from trauma, swelling, or an obstruction that prevents oral intubation—immediate action is required. While an endotracheal (ET) tube is the preferred method for quickly securing an airway, it may not always be possible.
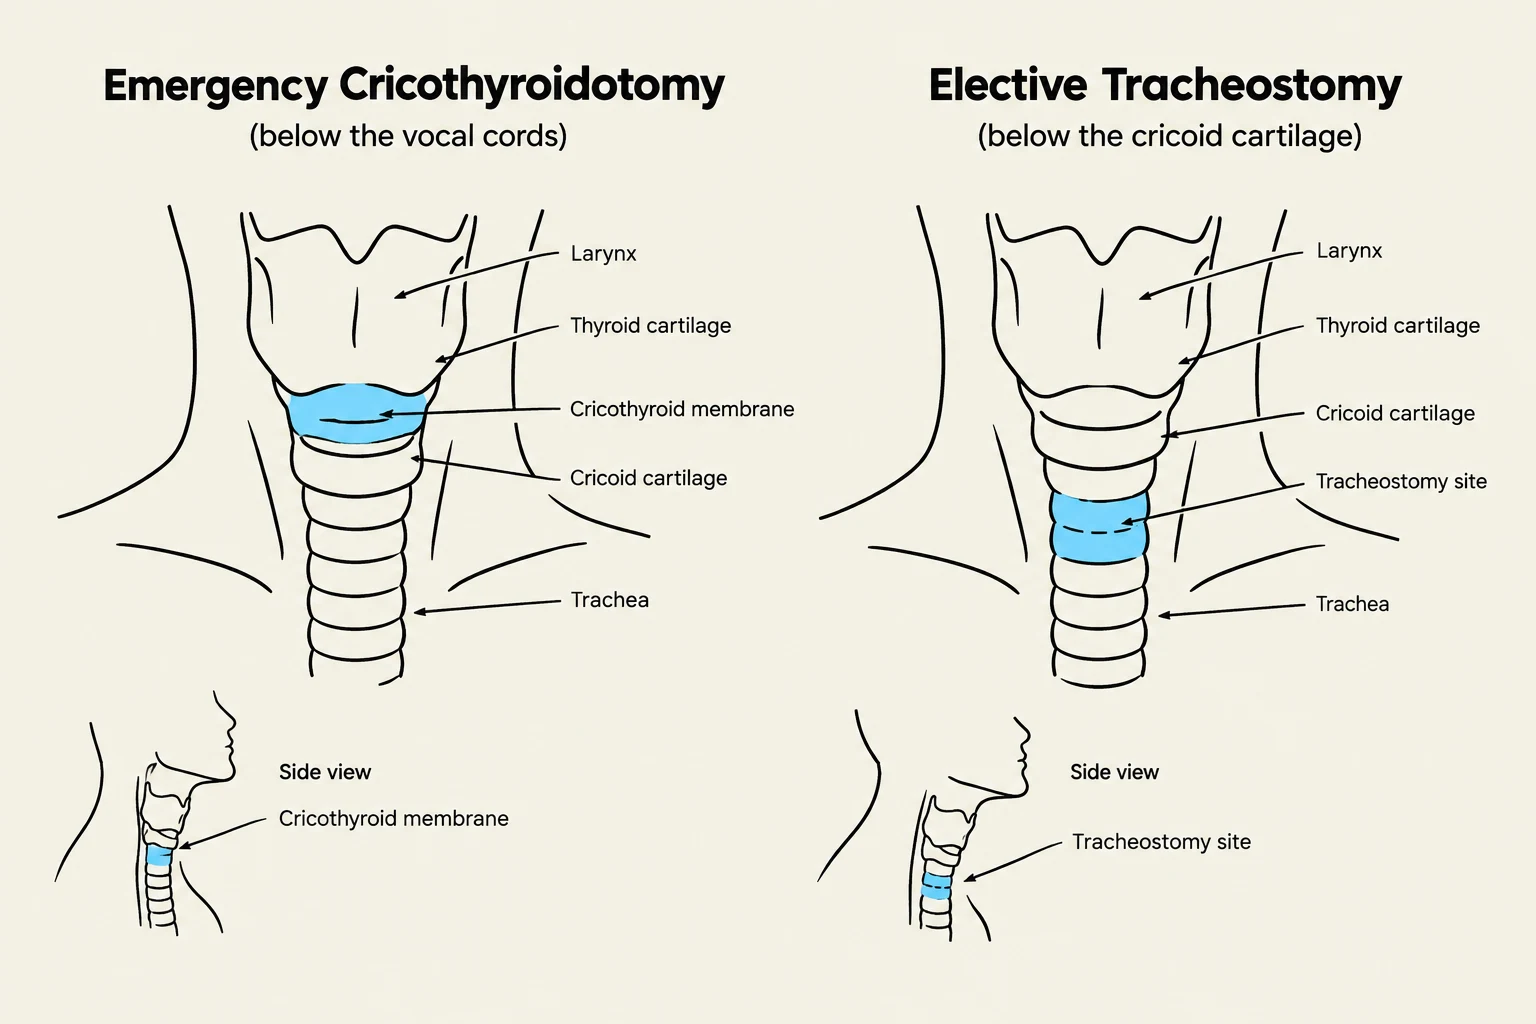
In these emergent situations, a cricothyroidotomy (or cricothyrotomy) may be performed. This is a surgical procedure completed within minutes by making an incision through the skin and the cricothyroid membrane on the anterior surface of the neck.
In contrast, a tracheostomy is a surgically created stoma used to establish a patent airway, bypass upper airway obstructions, facilitate secretion removal, or permit long-term mechanical ventilation. While cricothyroidotomy is an emergency procedure, tracheostomy is often used for patients requiring mechanical ventilation for longer durations (typically >2 weeks). Early tracheostomy (within 10–14 days) can actually reduce the number of ventilator-dependent days and improve patient communication.
Diagrams illustrating the anatomical locations for emergency cricothyroidotomy and elective tracheostomy.
Tracheostomy Tube Components and Types
Tracheostomy tubes are designed to be more comfortable and easier to maintain than endotracheal tubes because they are shorter, slightly wider, and do not reside in the mouth. Regardless of the specific type, most tracheostomy tubes share common components:
Faceplate or Flange: The part that rests against the patient's neck.
Obturator: A guide used to assist in the initial insertion of the tube.
Outer Cannula: The main body of the tube that stays in the stoma to keep the airway patent.
Inner Cannula: A removable component (either disposable or non-disposable) that is taken out for cleaning to maintain patency.
Cuffed vs. Cuffless Tubes
The choice between a cuffed or cuffless tube depends heavily on the patient's clinical status:
Cuffed Tubes: These are the most commonly used. The cuff is an inflatable, pliable plastic sleeve that encircles the lower, outer wall of the tube. When inflated, it seals the tube within the trachea, which prevents the escape of ventilating gases and protects the patient against aspiration.
Nursing Alert: When managing cuffed tubes, use the least amount of air needed to maintain a seal. Use a cuff manometer to measure inflation pressure at least every 8 hours; pressure should generally not exceed 20 to 30 cm H2O.
Cuffless Tubes: These are typically reserved for patients with long-term tracheostomies who no longer require mechanical ventilation and whose risk of aspiration has decreased.
Fenestrated Tubes
A fenestrated tube features an opening (fenestration) on the dorsal surface of the tube. This design allows air to pass upward through the larynx, which can promote spontaneous breathing and enable the patient to speak, provided the cuff is deflated and the inner cannula is removed.
Supporting Ventilation and Mechanical Modes
Mechanical ventilation is not a cure; it is a bridge to support the patient until they can breathe independently. Ventilation can be delivered via Positive Pressure Ventilation (PPV), which pushes air into the lungs, or Negative Pressure Ventilation, which pulls air in by creating sub-atmospheric pressure (such as an iron lung).
Modern ventilators use various modes to balance the work of breathing (WOB) between the machine and the patient:
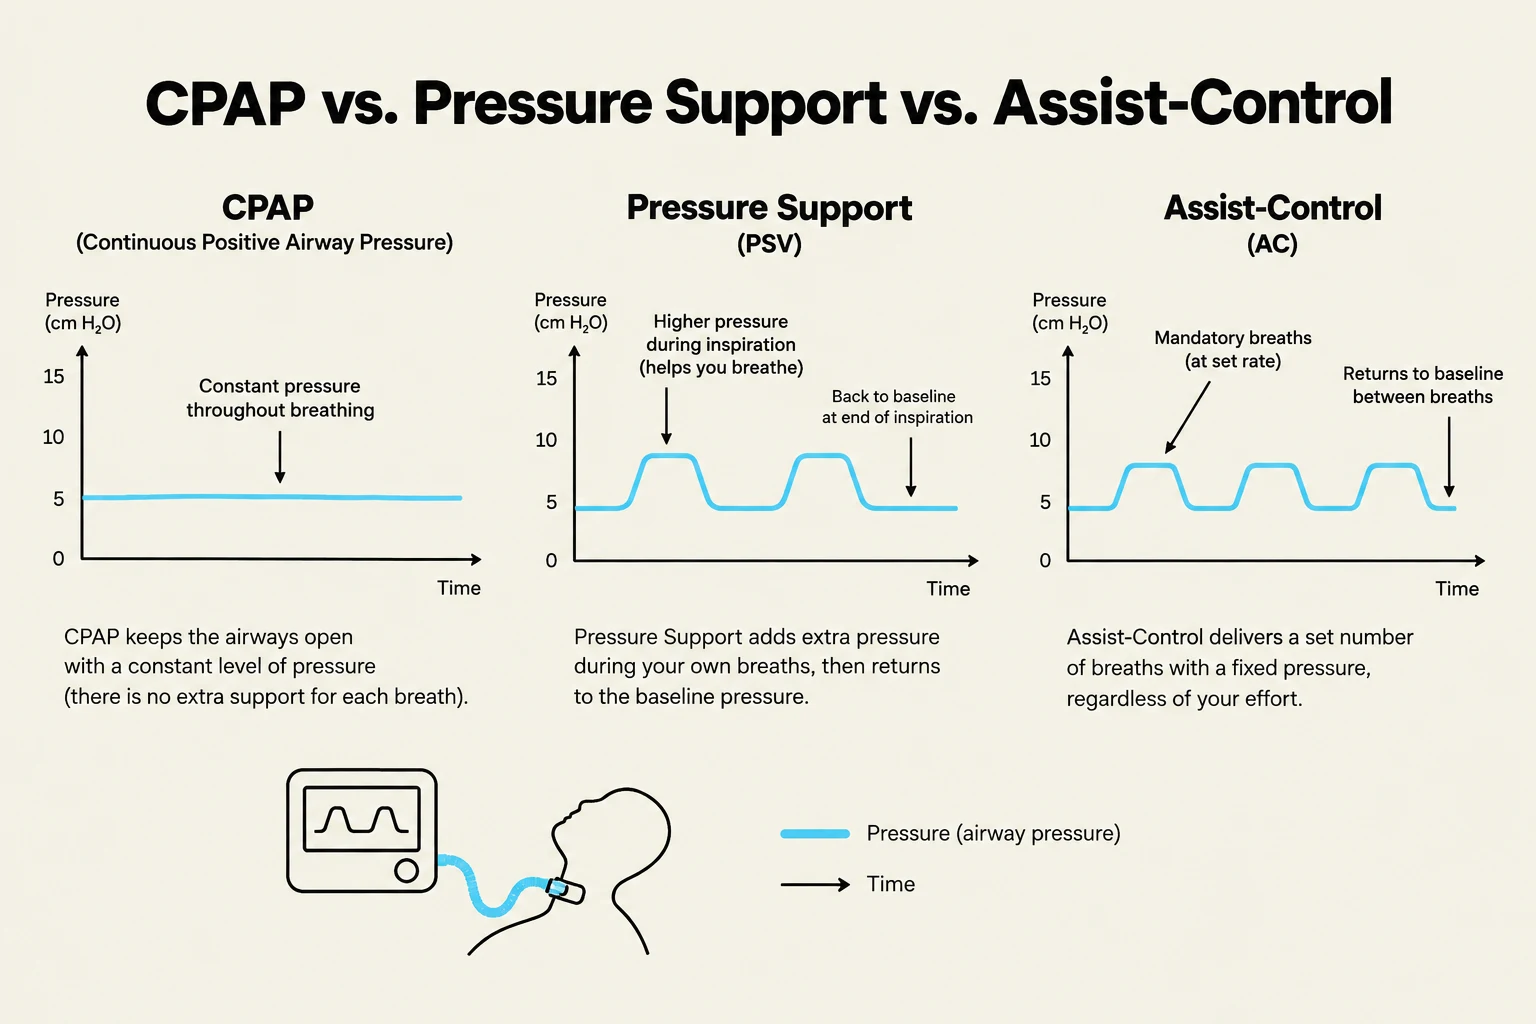
Full Support Modes: The ventilator does most of the work. Examples include Assist-Control (AC), where a preset tidal volume is delivered whenever the patient initiates a breath, and Pressure-Control (PC), which delivers breaths up to a set peak inspiratory pressure (PIP).
Partial Support Modes: Responsibility is shared. Synchronized Intermittent Mandatory Ventilation (SIMV) allows the patient to take spontaneous breaths between ventilator-delivered breaths.
Spontaneous Modes: The patient is responsible for almost all breathing. Pressure Support (PS) is the most common mode used to facilitate weaning; it applies pressure only during inspiration to decrease the patient's WOB. Continuous Positive Airway Pressure (CPAP) provides a single level of pressure during both inspiration and expiration.
Comparison of CPAP, Pressure Support (PSV), and Assist-Control (AC) ventilation modes, illustrating airway pressure over time for each.
Mechanical Ventilation Weaning
Weaning is the process of transitioning a patient from mechanical ventilation to independent, spontaneous breathing. This is a complex, multidisciplinary process that requires careful assessment of both respiratory and non-respiratory factors.
Clinical Readiness
Before attempting to wean, the underlying problem that necessitated ventilation should be resolving. Key indicators of readiness include:
Respiratory Status: Clear lungs on auscultation and chest X-ray, acceptable Arterial Blood Gas (ABG) values, and stable SpO2.
Non-Respiratory Status: The patient should be alert, well-rested, pain-free, and able to cooperate.
Physical Strength: The ability to tolerate a Spontaneous Breathing Trial (SBT) and the presence of sufficient muscle strength (often measured via negative inspiratory force).
Monitoring for Failure
During weaning trials, clinicians must watch for signs that the patient is not tolerating the decreased support. Signs of weaning failure include:
Tachypnea or Bradypnea (abnormal respiratory rates).
Tachycardia or Dysrhythmias.
Desaturation: A decrease in SpO2 or PaO2.
Mental Status Changes: Agitation, anxiety, or a decreased level of consciousness.
If these signs occur, the weaning trial must end, and the clinician should prepare for reintubation or a trial of noninvasive ventilation.
Exam Tip: When a patient is being extubated, they should be encouraged to take a deep breath and, in one smooth motion at the peak of inspiration, the cuff should be deflated and the tube removed. Always monitor the patient's vital signs and respiratory status for 2–3 hours post-extubation.
Keep reading for free.
Create an account to finish this reading and make it part of your study routine.