Gel Electrophoresis and DNA Recovery in Molecular Biology
An explanation of agarose gel electrophoresis, its principles, factors affecting DNA migration, and methods for DNA recovery from gels. Compares agarose and acrylamide gel electrophoresis.
In molecular biology, one of the most fundamental techniques for analyzing genetic material is gel electrophoresis. This method allows scientists to separate, identify, and eventually recover specific DNA fragments from a complex mixture. By utilizing the physical and chemical properties of DNA, researchers can determine the size of molecules and prepare them for downstream applications like cloning, sequencing, or further PCR analysis.
Principles of Agarose Gel Electrophoresis
Agarose gel electrophoresis is a technique used to separate DNA fragments primarily based on their molecular weight. The process relies on the fact that DNA molecules are negatively charged due to their phosphate backbone. When an electric current is applied to the gel, the DNA is forced to migrate through a highly crosslinked agarose matrix toward the positive pole (often marked in red).
The separation occurs because the agarose matrix acts as a molecular sieve. Smaller DNA fragments can navigate through the pores of the matrix more easily and thus migrate faster than larger, bulkier fragments. Mathematically, the distance of migration varies inversely with the logarithm of the molecular weight.
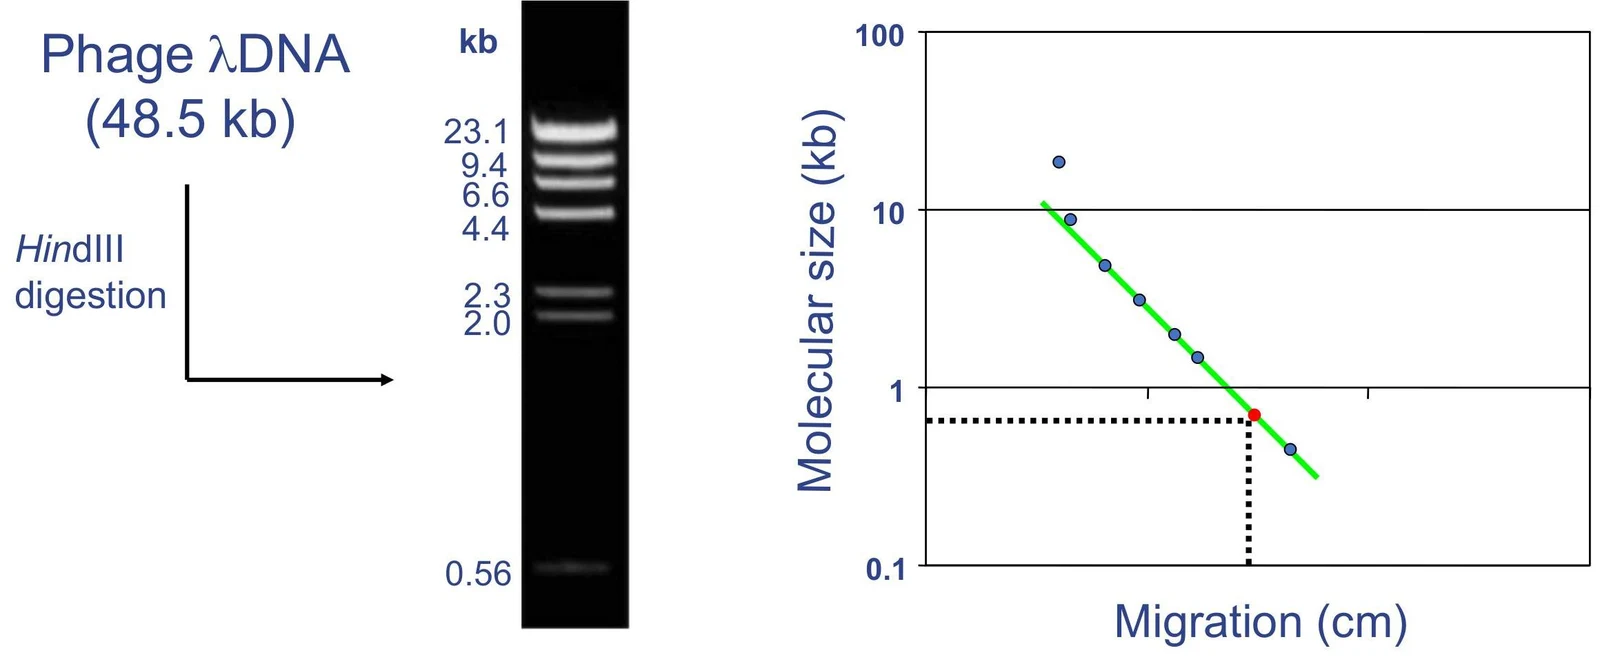
To estimate the size of unknown DNA fragments, researchers run a "molecular size standard" (a ladder of known fragment sizes) alongside their samples. By plotting the migration distance of these known fragments, one can create a molecular size standard curve to interpolate the size of the experimental bands.
This figure illustrates the process of DNA gel electrophoresis, showing a DNA ladder with known fragment sizes and a graph plotting molecular size against migration distance. This technique is used to separate DNA fragments based on their size.
Factors Affecting DNA Migration and Resolution
Several experimental parameters must be optimized to ensure high-quality results, characterized by sharp, distinct bands.
Agarose Concentration
The concentration of agarose in the gel dictates the pore size of the matrix, which in turn determines the optimal range of separation. A higher concentration creates smaller pores, which is ideal for resolving small fragments, while a lower concentration allows larger fragments to move through more effectively.
Agarose Conc. (%)
Range of Separation (kb)
0.5
1−30
0.7
0.8−12
1.0
0.5−10
1.2
0.4−7
1.5
0.2−3
2.0
0.05−2
Running Buffer
The choice of buffer is critical for maintaining pH and providing ions to carry the current. The two most common buffers are TAE and TBE:
TAE (Tris, Acetic acid, EDTA): Generally better for resolving large DNA bands, but may require recirculation during long runs.
TBE (Tris, Boric acid, EDTA): Offers higher buffer capacity and generates less heat, making it better for resolving small bands. However, the borate can sometimes interfere with enzymatic reactions if the DNA is intended for later use.
Loading and Staining
Before running the gel, DNA is mixed with a loading buffer. This buffer contains a density agent (like glycerol) to ensure the sample sinks into the well and a colored dye to track the progress of the run. Common dyes include Bromophenol blue, Xylene cyanol, and Orange G, which migrate at predictable rates depending on the gel concentration.
To visualize the DNA, a staining dye must be used. Ethidium bromide (EtBr) is a classic intercalating agent that fluoresces brightly under UV light, though it is a potential mutagen. Safer alternatives include SYBR Green (which fluoresces under blue light but may inhibit PCR) and Eva Green. Staining can be performed during electrophoresis (adding dye to the buffer or gel) or after electrophoresis.
DNA Recovery from Gels
Once the desired DNA band is identified and visualized, it often needs to be "recovered" or isolated from the agarose for further experiments. The choice of method depends on the required purity, the size of the fragment, and its intended use.
Commercial and DIY Methods
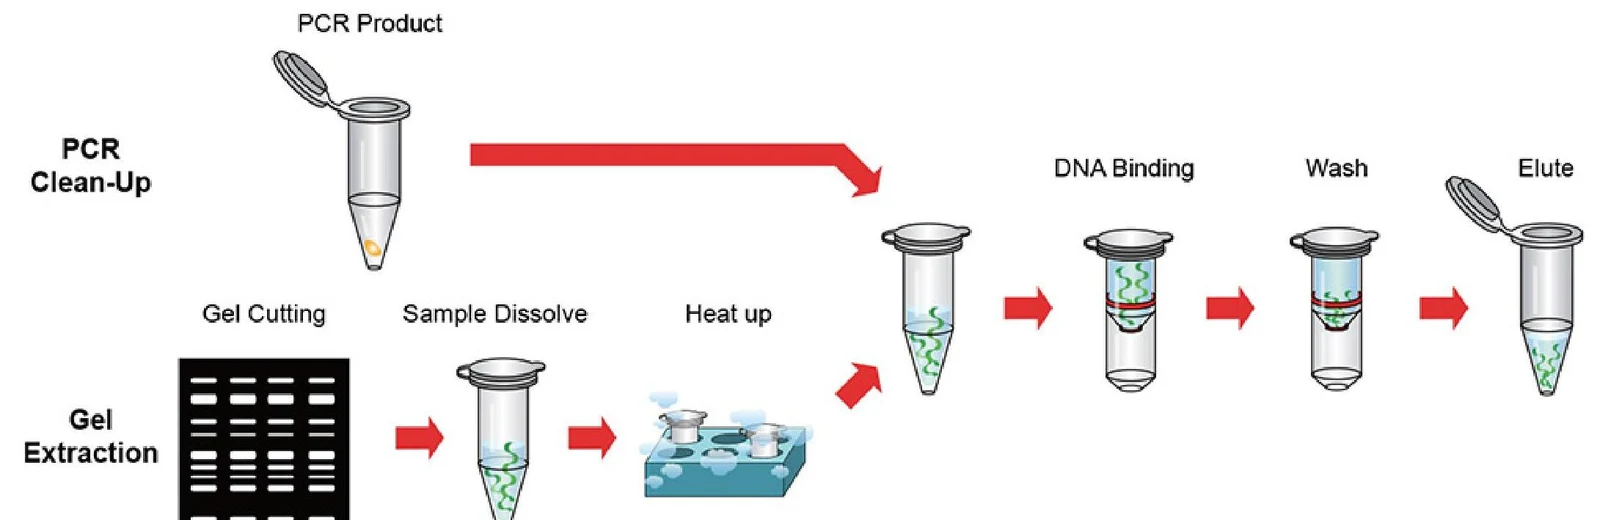
Commercial kits (such as the QIAquick Kit) are highly efficient. These typically involve melting the gel slice in a proprietary buffer, using isopropanol to precipitate the DNA, and then purifying it through a spin column.
For more resource-limited settings, "DIY" methods exist. These might involve cutting the band with a razor, crushing it in a makeshift spin column, and using a combination of NaCl and ethanol to precipitate the DNA.
Diagram illustrating the process of PCR clean-up and gel extraction for DNA purification.
Comparison: Agarose vs. Acrylamide
While agarose is the standard for general DNA separation, acrylamide gel electrophoresis is used when much higher resolution is required.
Feature
Agarose Gel
Acrylamide Gel
Pore Size
Larger
Much smaller
Resolution
Can resolve ~2% difference (e.g., 500 vs 510 bp)
Can resolve ~0.2% difference (e.g., 500 vs 501 bp)
Orientation
Horizontal
Vertical
Applications
General DNA separation
DNA sequencing, S1 nuclease assay, EMSA
Exam Tip: If a question asks which method to use for resolving two DNA fragments that differ by only a single base pair, the answer is almost always acrylamide gel electrophoresis due to its significantly higher resolving power.
Summary of DNA Recovery Workflow:
Separate: Run DNA through agarose gel.
Visualize: Stain with EtBr or SYBR Green and view under UV/Blue light.
Excision: Cut the specific band out of the gel.
Extraction: Use a commercial kit or chemical method to dissolve agarose and isolate DNA.
Keep reading for free.
Create an account to finish this reading and make it part of your study routine.