Foundations and Safety Principles of Magnetic Resonance Imaging (MRI)
This content explains the fundamental principles of Magnetic Resonance Imaging (MRI), including signal production, T1 and T2 weighting for contrast, signal suppression techniques, and critical safety protocols for MRI environments. It also covers clinical decision-making and pre-screening procedures.
Magnetic Resonance Imaging (MRI) is a sophisticated diagnostic tool that offers unparalleled visualization of soft tissue structures. Unlike X-ray or Computed Tomography (CT), which rely on tissue density and the attenuation of ionizing radiation, MRI functions by measuring tissue energy—specifically, the amount of signal received from hydrogen nuclei within the body. Understanding how this signal is produced, how different sequences manipulate that signal to create contrast, and the rigorous safety protocols required to manage the powerful magnetic field is essential for any clinician.
MRI Signal Production: The Four-Stage Sequence
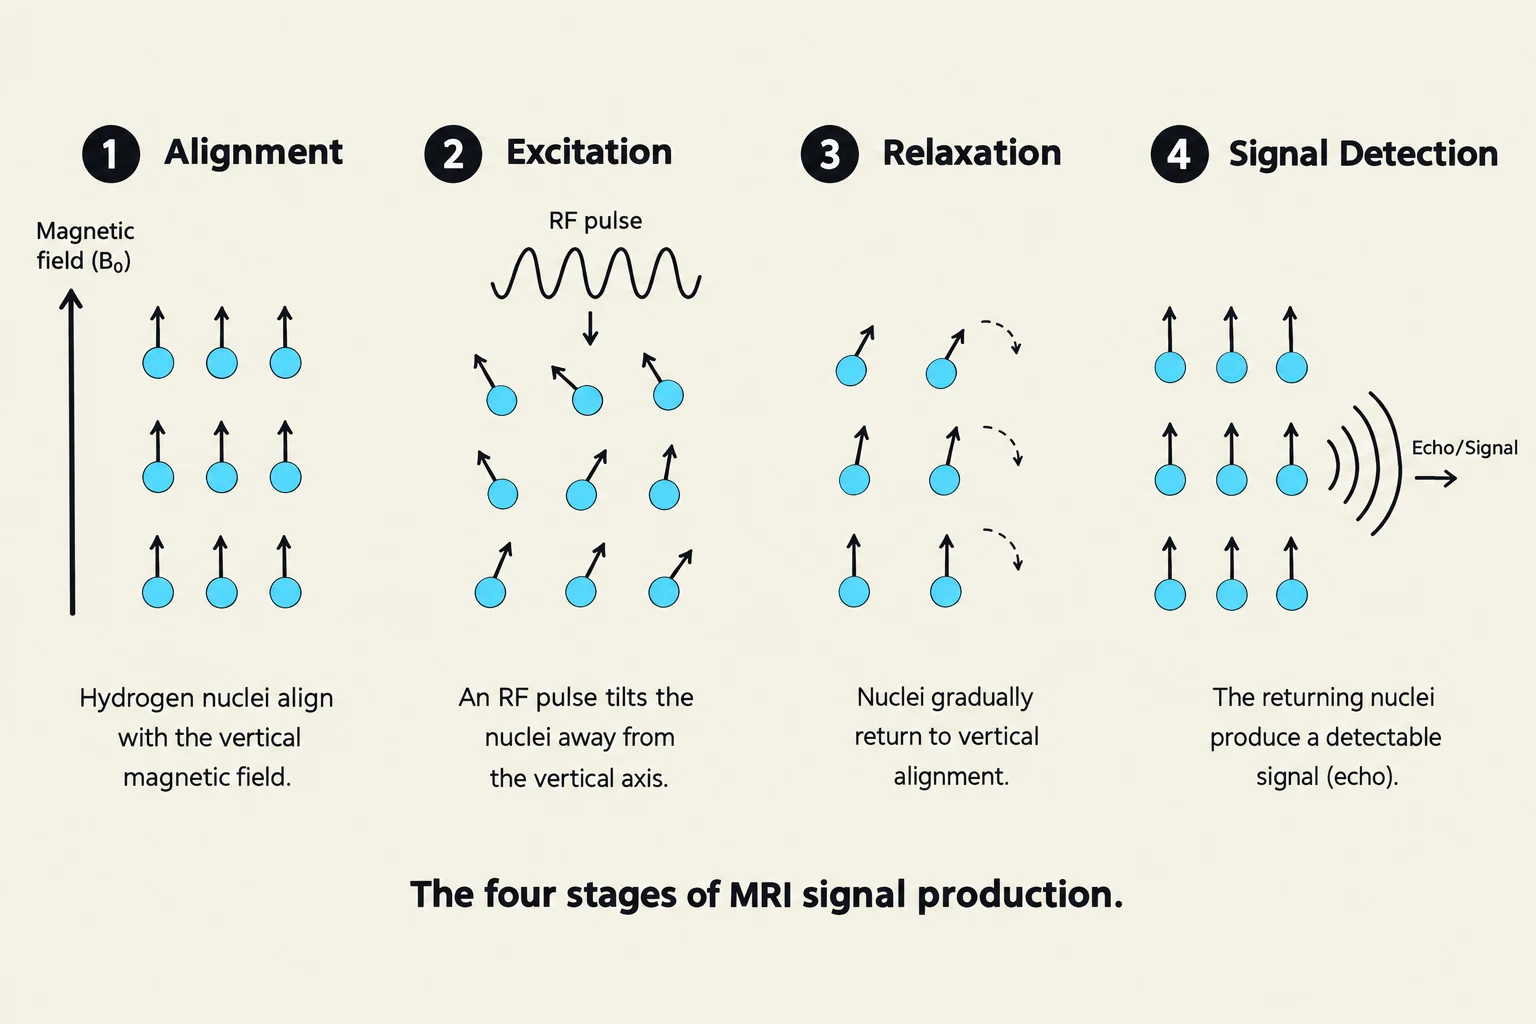
The four stages of MRI signal production: Alignment, Excitation, Relaxation, and Signal Detection.
The creation of an MRI image is a dynamic process involving the manipulation of hydrogen nuclei (protons) using magnetic fields and radiofrequency energy. Because the human body is composed largely of water and fat, it is rich in hydrogen, making it an ideal medium for this technology.
The fundamental conceptual sequence of MRI involves four distinct stages:
Alignment: Under normal conditions, hydrogen nuclei spin in random directions. When the patient is placed inside the MRI scanner, these nuclei align themselves with the powerful static magnetic field of the machine.
Excitation: A radiofrequency (RF) pulse is applied to the tissue. This pulse provides energy that alters the alignment of the hydrogen nuclei, knocking them out of their equilibrium state.
Relaxation: Once the RF pulse is turned off, the hydrogen nuclei begin to return to their original alignment with the main magnetic field. This process is known as relaxation.
Signal Detection: As the nuclei relax, they emit energy in the form of a measurable "echo" or signal. The machine detects this signal, and computer algorithms translate the timing and intensity of these signals into a grayscale image.
Clinical Pearl: Remember that MRI does not "see" bones in the same way CT does. While CT is excellent for bony architecture, MRI is the gold standard for evaluating soft tissue, such as ligaments, tendons, and the brain.
Understanding Contrast: T1 and T2 Weighting
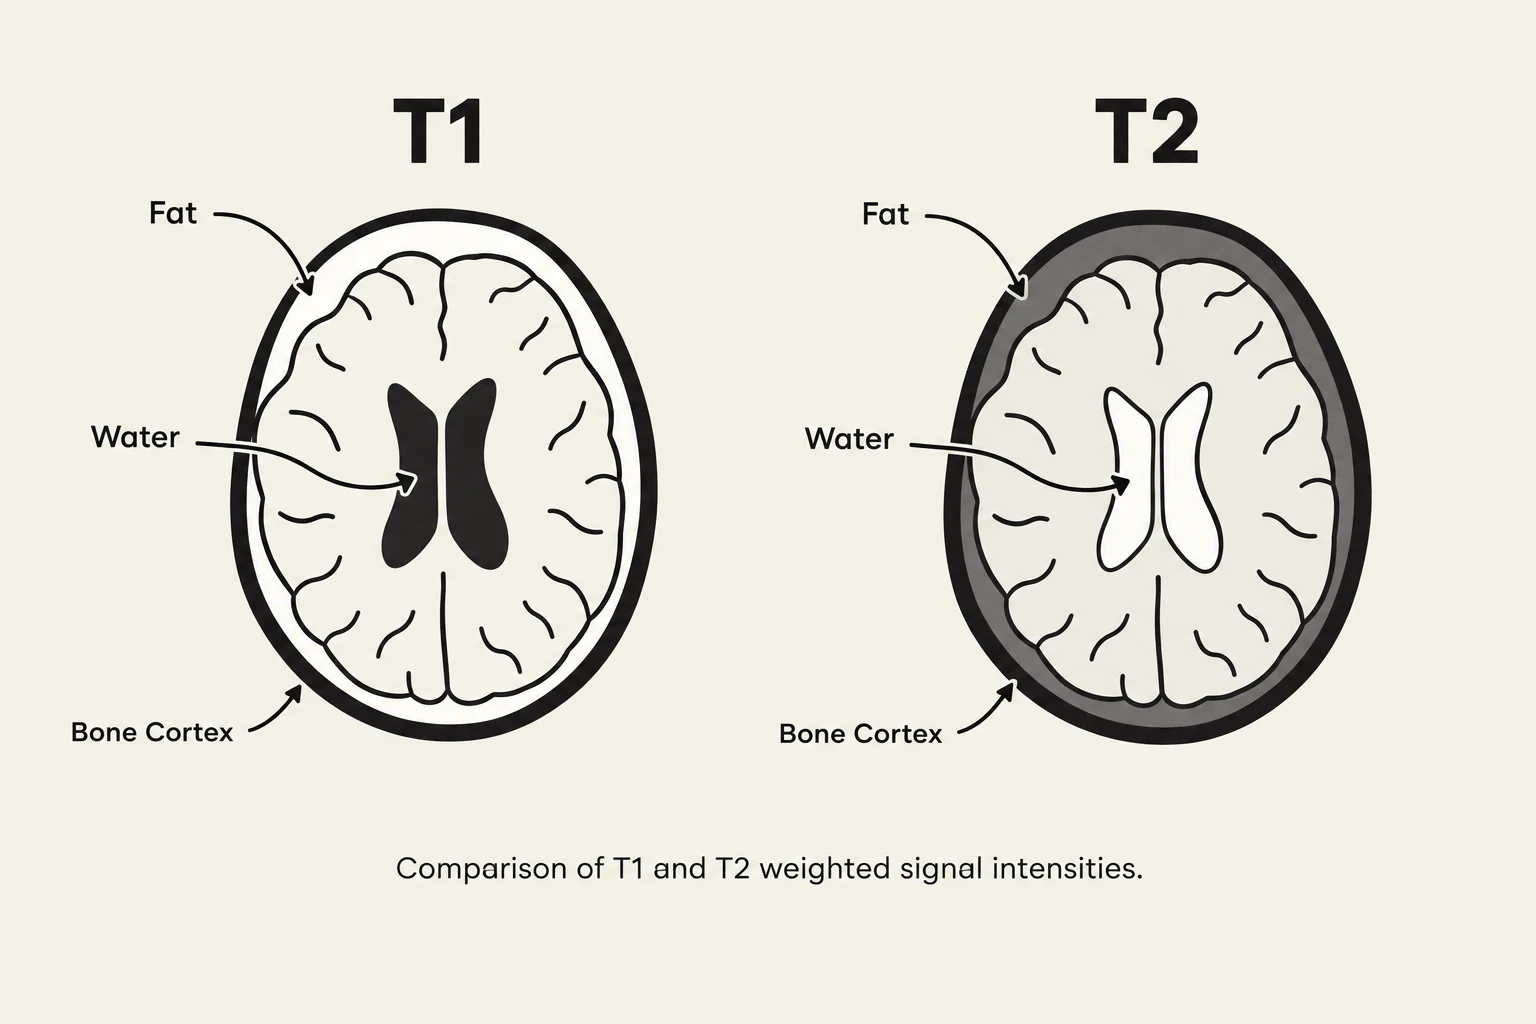
Comparison of T1 and T2 weighted signal intensities in a brain MRI.
The "contrast" in an MRI—the difference in brightness between two adjacent tissues—is determined by how quickly different tissues undergo relaxation. We categorize these relaxation behaviors into two primary weighting techniques: T1 and T2.
T1-Weighted Imaging
T1-weighted sequences are primarily used to visualize structural detail. In T1 imaging, the contrast is determined by the "time to realignment."
Fat: Rapidly realigns and appears bright.
Water/Edema: Realigns slowly and appears dark.
Bone Cortex: Appears very dark.
T2-Weighted Imaging
T2-weighted sequences are the preferred modality for identifying pathology. Most pathological processes (inflammation, infection, tumors) involve an increase in water content (edema).
Water/Edema: Appears bright.
Fat: Appears less bright or dark compared to T1.
Protein-rich fluid: Typically appears bright.
Tissue Type
T1 Appearance
T2 Appearance
Fat
Bright
Bright
Water/Edema
Dark
Bright
Bone Cortex
Very Dark
Very Dark
Muscle
Intermediate
Intermediate
Gadolinium (Contrast)
Bright
Minimally Dark
Signal Suppression Techniques
In many clinical scenarios, certain tissues act as "highlighters," producing such a bright signal that they obscure the subtle pathology a clinician is trying to find. Signal suppression techniques are used to "turn off" or darken these specific signals.
Fat Saturation and STIR
Fat is naturally bright on many sequences. To see a stress fracture, an infection, or a deep muscle tear, clinicians often use Fat Saturation or STIR (Short Tau Inversion Recovery) sequences to darken the fat. This allows the bright signal of edema (water) to stand out clearly against a dark background.
FLAIR (Fluid Attenuated Inversion Recovery)
A common challenge in neuroimaging is that Cerebrospinal Fluid (CSF) is very bright on T2-weighted images. If a lesion is located right next to a ventricle filled with CSF, the bright CSF might hide the lesion. FLAIR sequences are used to specifically suppress the signal from water/CSF, making the CSF appear dark and allowing subtle lesions (such as those seen in Multiple Sclerosis) to become visible.
MRI Safety: The "Always On" Principle
Safety is the most critical aspect of MRI practice because the physics of the machine pose unique risks. The most important rule to memorize is: The magnet is always on. Even if the machine is not actively scanning, the magnetic field is present and active.
Risks: Projectiles and Heating
The magnetic field is significantly stronger than any domestic magnet—up to 3,000 times stronger than a refrigerator magnet. This creates two primary dangers:
Projectiles: Ferromagnetic objects (oxygen tanks, scissors, certain wheelchairs) can become lethal projectiles if they are pulled into the bore of the magnet.
Tissue Heating: The RF pulses used during excitation can cause heating in tissues, particularly if the patient has certain metallic implants.
Quenching refers to the rapid boil-off of liquid helium used to cool the magnet. While it can be used in emergencies to shut down the field, it is extremely costly and can be dangerous.
The Four Safety Zones
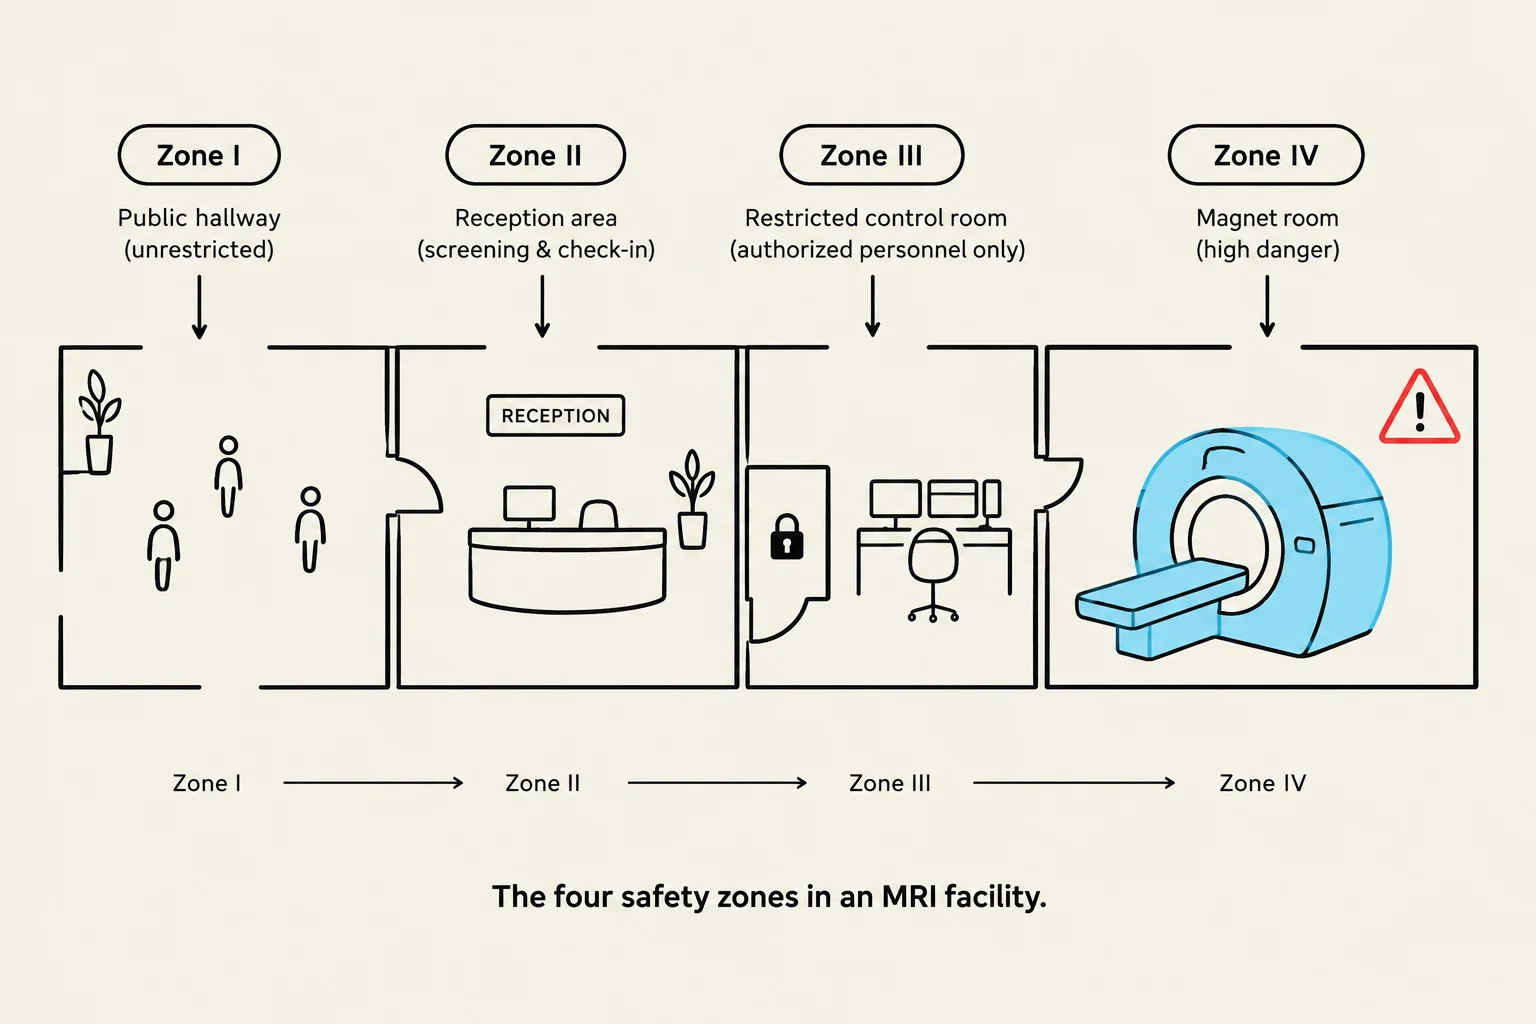
The four safety zones in an MRI facility.
To manage these risks, MRI facilities are organized into four distinct zones:
Zone I: Public access area (e.g., the hospital hallway). No danger here.
Zone II: The transition zone. This is where patients are greeted and prepared. It requires supervision by MR staff to ensure patients are ready to enter the more dangerous areas.
Zone III: Access-restricted area (e.g., the control room). This area is protected by coded locks. The magnet is dangerous here because an unscreened person could enter the vicinity of the field.
Zone IV: The magnet room itself. This is the highest-risk area where the magnetic field is at its strongest.
Clinical Decision Making and Pre-Screening
Before ordering an MRI, a clinician must perform a mental "triage" to ensure the study is appropriate for the patient and the clinical question.
The Pre-Screening Checklist
Clinicians must perform thorough pre-screening to prevent injury or diagnostic error. Key considerations include:
Metallic Foreign Bodies: Especially in the eyes or near the brain.
Implants/Devices: Pacemakers, cochlear implants, or aneurysm clips (must be verified as "MRI Conditional").
Pregnancy: While MRI has no ionizing radiation, caution is exercised.
Claustrophobia: The narrow bore of the magnet can be distressing; patients may need anxiolytics (sedation).
Contrast Agents: Assessing kidney function if Gadolinium is required.
Choosing the Right Modality
A common mistake is ordering an MRI when a simpler, faster, or more appropriate test exists. When deciding, ask:
Could an X-ray answer the initial question?
Is the concern primarily bony or soft tissue? (If bone, consider CT; if soft tissue, consider MRI).
Will the MRI change management?.
Is the patient safe for MRI?.
If the decision is unclear, clinicians should consult the ACR Appropriateness Criteria to select the study that best answers the clinical question while considering radiation, cost, and patient safety.
Exam Tip: If a question asks about the primary difference between MRI and CT, look for "tissue energy/signal" (MRI) versus "tissue density/attenuation" (CT).
Keep reading for free.
Create an account to finish this reading and make it part of your study routine.