A guide to systematically placing limb and precordial electrodes for accurate 12-lead EKG tracings, emphasizing anatomical landmarks and common error identification.
An Electrocardiogram (EKG or ECG) is a vital diagnostic tool used to monitor the electrical activity of the heart. However, the accuracy of the resulting tracing is entirely dependent on the precise placement of the electrodes. Incorrect placement can lead to "pseudo-pathologies"—electrical patterns that look like heart disease but are actually just artifacts of poor lead positioning. This guide provides a systematic approach to placing both limb and precordial electrodes using anatomical landmarks to ensure a high-quality, diagnostic tracing.
Understanding the Leads: Bipolar and Augmented
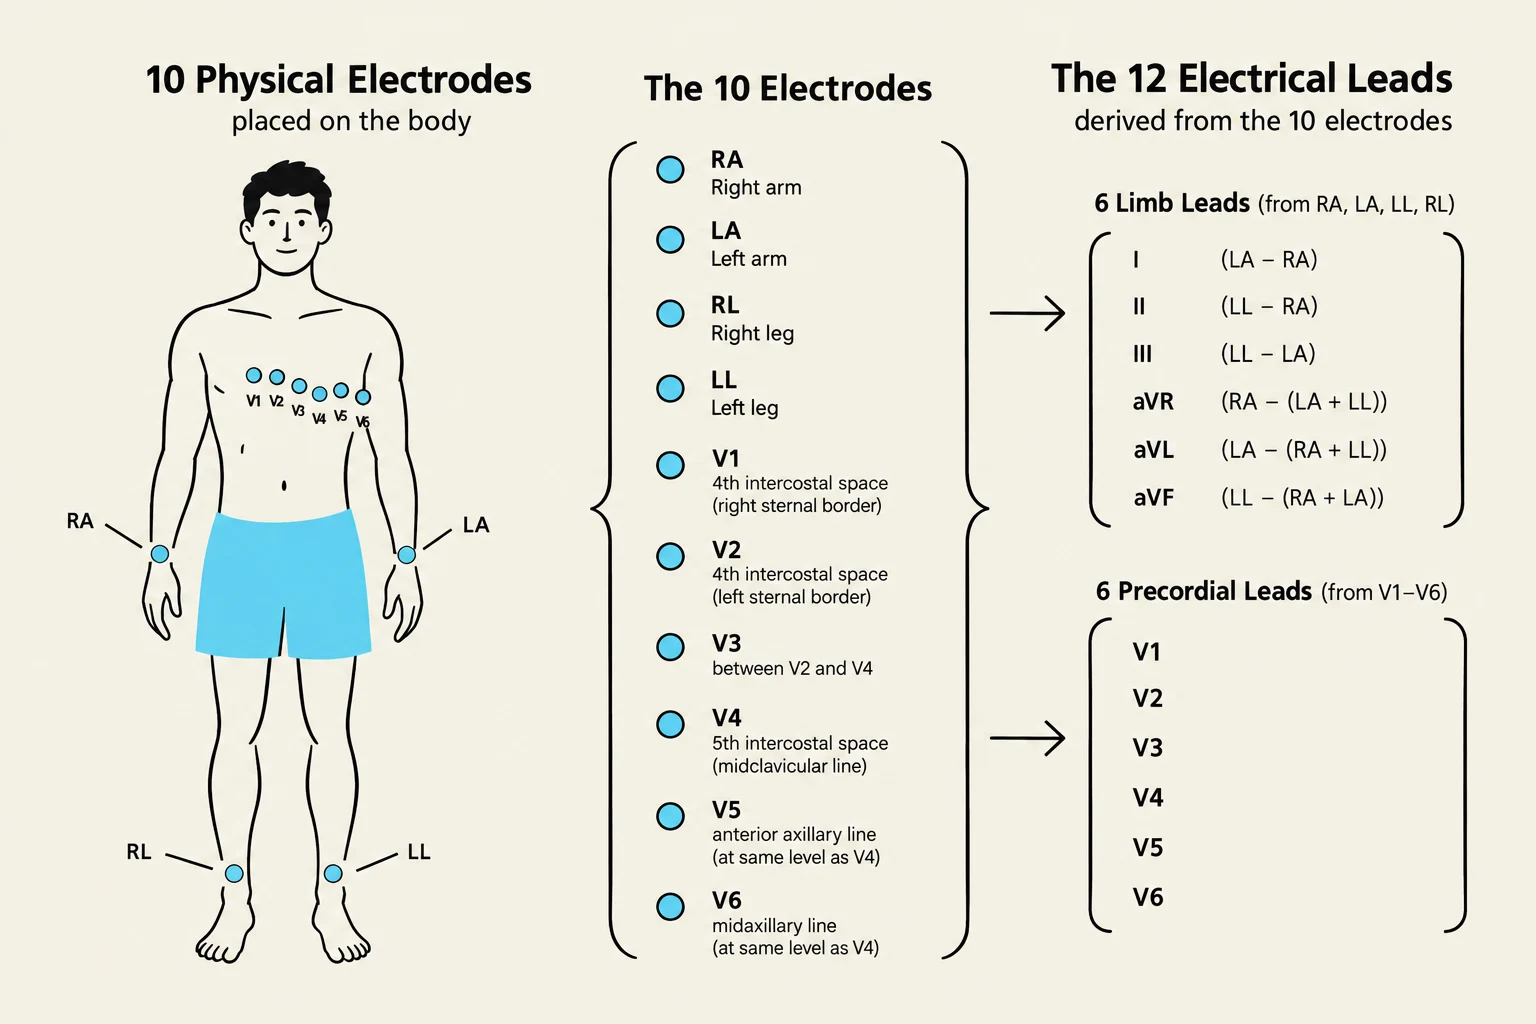
Before placing the stickers, it is essential to understand what they are measuring. A 12-lead EKG does not actually use 12 physical wires on the body; rather, it uses 10 electrodes to derive 12 different electrical "views" of the heart.
The limb electrodes produce two types of leads:
Bipolar Leads (L1, L2): These measure the voltage difference between two specific limb electrodes.
Augmented Leads (aVR, aVL, aVF): These are unipolar leads that use one limb electrode in combination with the average of the others to create a single-point view.
Diagram illustrating the placement of 10 physical electrodes on the body and how they are used to derive the 12 electrical leads for an electrocardiogram (ECG).
Limb Electrode Placement
Limb electrodes are placed on the torso or the limbs to capture the electrical activity in the frontal plane. While traditionally placed on the arms and legs, modern clinical practice allows for flexibility to accommodate patient needs.
Anatomical Locations
The standard locations for the four limb electrodes are:
RA (Right Arm): Right anteroboulder, below the clavicle.
LA (Left Arm): Left anteroboulder, below the clavicle.
LL (Left Leg): Left lower abdomen or leg.
RL (Right Leg): Right lower abdomen or leg. This serves as the ground/reference electrode and does not contribute to the electrical views directly.
Clinical Tip: You do not necessarily need to place electrodes on the actual limbs. If a patient has amputations, IV lines, or stenosis, placing the electrodes on the shoulders or hips provides the same electrical tracing.
Skin Contact and Troubleshooting
For the best signal, place electrodes on soft tissue with good contact and avoid bony prominences. If a lead appears "flat" or shows very low voltage, suspect poor skin contact or a disconnected lead rather than a cardiac issue.
Precordial (Chest) Electrode Placement
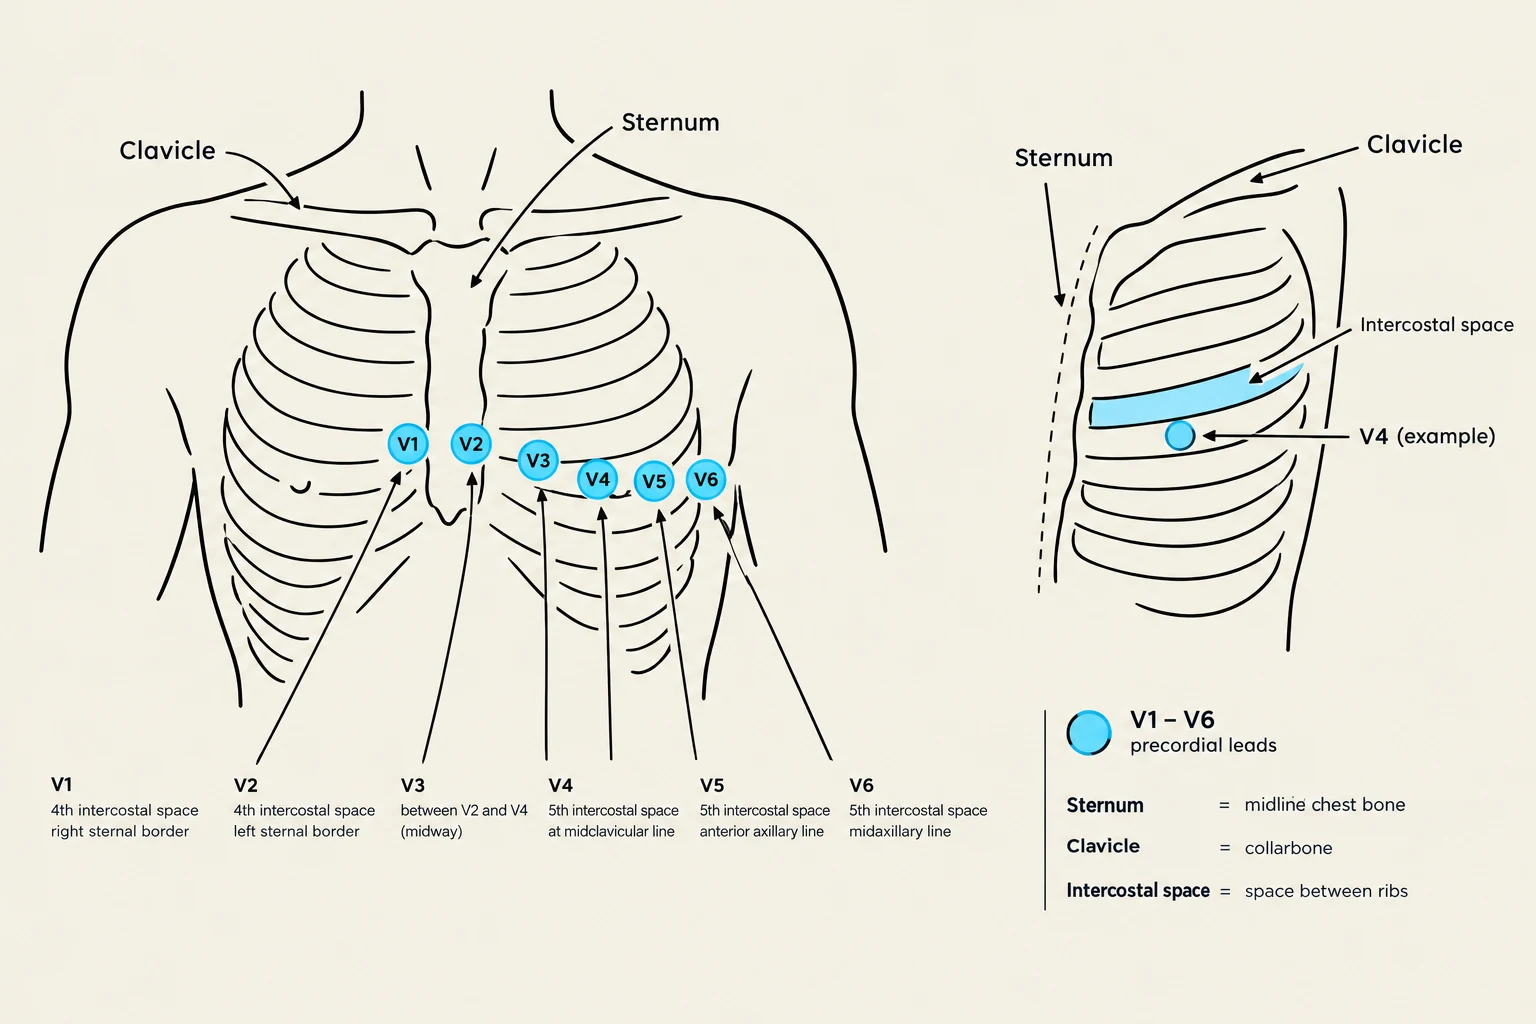
The precordial leads (V1 through V6) provide a horizontal view of the heart. This is where most student errors occur, specifically regarding the intercostal spaces.
The Intercostal Space Counting Technique
To place these correctly, you must use the Angle of Louis (the bony ridge where the manubrium meets the body of the sternum) as your primary landmark.
Find the Angle of Louis: Locate the bony ridge on the sternum.
Identify the 2nd Intercostal Space: Move down one space from the Angle of Louis.
Locate the 4th Intercostal Space: Count down two more spaces from the 2nd space. This is your "anchor" for the first two leads.
Precise V1–V6 Positioning
Once you have found the 4th intercostal space, follow this sequence:
Lead
Specific Location
V1
4th intercostal space, at the right border of the sternum
V2
4th intercostal space, at the left border of the sternum
V3
Placed halfway between V2 and V4
V4
5th intercostal space, at the left midclavicular line
V5
Horizontal level with V4, at the left anterior axillary line
V6
Horizontal level with V4, at the left midaxillary line
Diagram illustrating the placement of precordial ECG leads (V1-V6) on the chest, with definitions for anatomical landmarks like the sternum, clavicle, and intercostal space.
The "45 Student Error": A common mistake is placing V1 and V2 in the 2nd or 3rd intercostal space. Always count from the Angle of Louis to ensure you are in the 4th space.
Color Coding and Standards
Different medical facilities may use different color standards. It is critical to verify your facility's specific protocol before beginning.
AHA Standard (Common in US): Often uses White (RA), Black (LA), Red (LL), and Green (RL).
IEC Standard: May differ in color assignments.
Always check the lead wires against your machine's manual to ensure the right color corresponds to the right anatomical position.
Artifact and Error Identification
Even with perfect placement, the tracing may be unreadable due to artifact (electrical interference or movement).
Common Errors to Watch For:
Misplaced Precordial Leads: If V1/V2 are too high, it can mimic a bundle branch block.
Limb Lead Errors: If Lead I looks flat or inverted, suspect a limb lead has been swapped or is improperly placed.
Movement/Muscle Tremor: Patient movement or shivering can create jagged lines that obscure the rhythm.
Quality Check Summary
Before interpreting a tracing, perform these three checks:
Verify Electrode Contact: Ensure they are on soft tissue and not peeling.
Rule out Artifact: Check if the "flat line" is a disconnected lead rather than an asystole (cardiac arrest).
Check Settings: Ensure the machine is set to the correct gain and speed.
Quick Mnemonic for Precordial Placement:"V1 and V2 are 4th space, sternum side by side. V3 sits in between them. V4 is 5th space, midclavicular. V5 goes anterior axillary. V6 goes midaxillary."
Keep reading for free.
Create an account to finish this reading and make it part of your study routine.